Thursday, October 4, 2012

Baby Socks/Booties

Salam and very good morning

Just want to share my rainbow baby socks..

tadaaaaa...


so cute right =D


This pattern i learned from youtube..
but not exactly follow the pattern..i changed a little bit at the top of the socks..

i attached the video for your review..

Part 1


Part 2


Happy crocheting.. =D

Thursday, August 30, 2012

Sweet Baby Mary Jane Booties Pattern

Baby Mary Jane

Sharing pattern from Cheryl Wyda Lojimin


Pattern :

Hook size : 4.00mm
Yarn : worsted yarn

Sole : Hot pink
ch 13
Row 1 - sc in 2cd ch, sc 7 times, hdc 3 times, 7hdc in last ch, finish the rest of the round working along the back of the chain, hdc 3 times, sc 7 times, 4sc in the last/first ch, sl st to the first sc (32)

Row 2 - ch 1, sc in same sc, sc 9 times, hdc, 2hdc  3 times, 3hdc, 2 hdc 3 times, hdc, sc 10 times, 2sc 3 times, sl st to the first hdc (43)

Row 3 - ch 2, hdc in same sc, hdc 11 times, * 2hdc, 1hdc* 7 times, hdc 11 times, 2hdc, hdc, 2hdc twice, hdc, 2hdc, sl st to the first hdc (54)

Shoe : Light pink

Row 4 - ch 1, working in back stitches, sc around, sl st to the first sc (54)
Row 5-6 - ch 1, wroking side sc around, sl st to the first sc turn (54)
Row 7-8 - ch 1, sc around, sl st to the first sc (54)
Row 9 - ch 1, sc in same sc, sc 12 times, sc2tog, dc2tog 7 times, sc2tog, sc around, sl st to the first sc (45)
Row 10 - ch 1, sc in same sc, sc 10 times, sc2tog, dc2tog, dc, dc3tog, dc, dc2tog, sc2tog, sc around, sl st to the first sc (39)


Strap :
slip st 10th st from hook, ch 16, dc 2nd from hook, dc 14 times, slip st.

sc around inc strap with green yarn


[for those that try to make this mary janes, pleasure if can share here]


- Happy Crocheting -


Wednesday, July 4, 2012

Amigurumi Pear

My Own Project !!


Free Pattern From Planet June

Pear:
worked from top down

With a pear-coloured yarn, make a magic ring, ch 1.

Rnd 1: 6 sc in magic ring. (6 st)

Rnd 2: 2 sc in each st around. (12 st)

Rnd 3: (2 sc in next st, sc in next 3 st) three times. (15 st)

Rnd 4: sc in each st around. (15 st)

Rnd 5: (sc in next 2 st, 2 sc in next st, sc in next 2 st) three times. (18 st)

Rnds 6-9: sc in each st around. (18 st)

Rnd 10: (2 sc in next st, sc in next 2 st) six times. (24 st)

Rnd 11: (2 sc in next st, sc in next 3 st) six times. (30 st)

Rnds 12-13: sc in each st around. (30 st)

Rnd 14: (2 sc in next st, sc in next 4 st) six times. (36 st)

Rnds 15-17: sc in each st around. (36 st)

Rnd 18: (sc2tog, sc in next 4 st) six times. (30 st)

Rnd 19: sc in each st around. (30 st)

Rnd 20: (sc2tog, sc in next 3 st) six times. (24 st)

Rnd 21: sc in each st around. (24 st)

Rnd 22: (sc2tog, sc in next 2 st) six times. (18 st)

Rnd 23: (sc2tog, sc in next st) six times. (12 st). 


Stuff pear through hole, making sure to push the stuffing right up to the tip of the pear.

Rnd 24: (sc2tog) six times. (6 st). 


Cut the yarn, leaving a long (approx 12″/30cm) yarn end.


Stalk:
With brown or black yarn, ch 7.

Row 1: sl st in 2nd chain from hook and in each remaining chain. (6 st)
Note: I like to work into the back bumps of the chain, but you can work into the chain normally if you prefer.
Cut yarn, leaving a long (approx 12″/30cm) yarn end. Draw end through last loop and pull tight to fasten off.
Finishing: 
Using a yarn needle and the long yarn end from the pear, close up the remaining hole at the bottom of the pear. Pass the yarn end through the pear, coming out somewhere along its side. Draw the yarn tight, and snip the end close to the pear. The yarn end should retract back inside the pear after it is cut.
Using a yarn needle and the long yarn end from the stalk, pass the yarn through the pear from top middle to bottom middle (you’ll have to squash the pear to get the needle all the way through!), so the base of the stalk sits over the magic ring at the top of the pear.
Make 3 small overlapping stitches at the bottom of the pear, to form an asterisk shape.

Pass the yarn end back up through the pear to the top, then pull the yarn tighter so that the bottom of the pear is drawn up slightly to help flatten the base.


The top of the pear may have been squashed down when you tightened the yarn. If so, insert the yarn needle under a few stitches at the top and pull up to lift the top of the pear back into shape.


Knot the yarn end and the starting tail from the stalk together, then thread both ends onto the yarn needle and pass them through the pear, coming out somewhere along its side. Draw the yarn tight, and snip the ends close to the pear. The yarn ends should retract back inside the pear after they are cut.

Squeeze and squash the pear to redistribute the stuffing inside and coax the pear back into its perfect shape.

Thursday, June 28, 2012

Headband


Booties Pattern

Challenge Yourself !!!


Baby Dress

Dress for Girls !!!


Simple Bag

Squares Bag !!


Hat Pattern

Measure the Head First !!!


Gorgeous

Just Sharing !!!


So beautiful flower crochet..


i like most..

Alphabet Motif

ABC Crochet !!


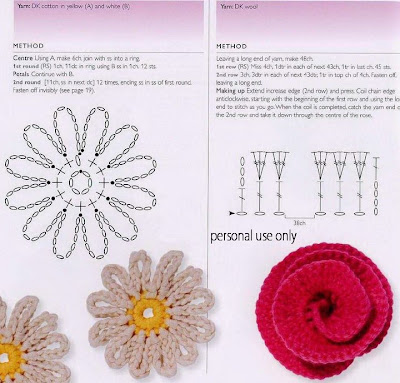
Flower Pattern

Try It !!!


Add more petal to make biggest flower

Rose

Try This One


Enjoy crocheting..

Flower

Nice Flower to Try!!


Another one!! 

i got this two type of pattern form Jeannette if i'm not mistaken..
i already forgot where i get it..sorry..

fun crocheting..hehe